How to set up AWS CloudFront cross-account logging
WARNING:
This guide was written in the context of AWS CloudFront's previous legacy logging feature, rather than the current "Standard logging (v2)" which was introduced on November 20th 2024. There is a chance that the information in this guide either is not complete for the new version of CloudFront standard logging, or that it performs steps that are no longer necessary.
If you follow this guide with CloudFront standard logging v2, please let me know if it worked for you. You can reach out either through the feedback link at the bottom of this post or via email, which you can find at the very bottom of this page.
You can configure AWS CloudFront to send access logs to S3. The details on how to do this cross-account though was not trivial for me to identify.
This guide attempts to summarize the steps required as succinctly as possible.
Terms used in this guide
-
Source account: The account that owns the CloudFront distribution(s) that you want to send logs from.
-
Target account: The account that owns the S3 bucket that you want to send the logs to.
-
Canonical user ID: A unique identifier for an AWS account that is primarily used in the context of S3. This is not the same as the regular AWS account ID.
This identifier is used to ensure the target account retains access to its own S3 bucket.
Target account setup
-
Create an S3 bucket for this purpose (or reuse an existing one if you have one that fits).
-
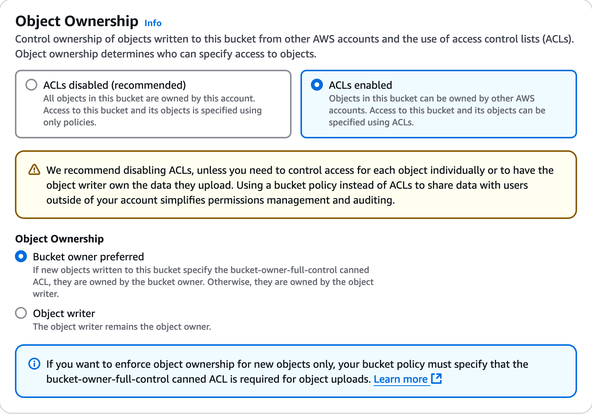
Object ownership/ACLs: The bucket has to be set up with legacy ACLs enabled, as CloudFront does not support bucket policies. If you create the bucket through the AWS Console, select "ACLs enabled" with "Bucket owner preferred" during creation:

Through the CLI, API, or Infrastructure as Code (like CloudFormation) you will have to provide the "object ownership" setting with the
BucketOwnerPreferredvalue. -
Name: I recommend choosing an obscure bucket name as (from what I found) there is no way to restrict which CloudFront distributions will be able to log to this bucket. In other words: if you choose an easily guessable name, anyone might be able to configure their CloudFront distributions to log into your S3 bucket, incurring costs for you.
-
-
(This step is not required if you configure the bucket through the AWS Console:) Retrieve the canonical user ID of the target account to ensure modifying the bucket ACL later on will not disallow the target account from accessing its own bucket.
You can retrieve the ID through the AWS CLI:
This will return the canonical user ID, which is a 64-character long string of hexadecimal characters.
If you use Terraform, you can use the following data-resource to retrieve the canonical user ID:
data "aws_canonical_user_id" "current" {}The ID will be available as
data.aws_canonical_user_id.current.id. -
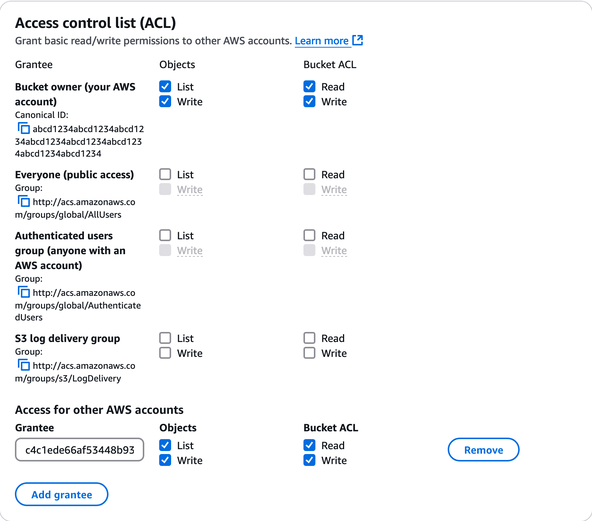
Configure the bucket ACL to allow CloudFront to write logs to it.
If you do this through the AWS Console, navigate to the bucket's permissions tab, modify the ACL, and add CloudFront's well-known canonical user ID as a grantee with all permissions:

CloudFront's canonical user ID:
c4c1ede66af53448b93c283ce9448c4ba468c9432aa01d700d3878632f77d2d0. (You can find this ID in the AWS CloudFront documentation.)If you do this through the AWS CLI, you can use the following command. Please make sure to replace
<bucket-name>with the name of your bucket, and<target-account-canonical-user-id>with the canonical user ID of the target account that you retrieved in the previous step: -
Configure the bucket policy to allow the source account(s) to interact with the bucket's ACLs.
Replace
<source-account-id>with the account ID of your source account. Add more AWS principals if you have more than one source account. Replace<bucket-name>with the name of the bucket.
Source account setup
Add an S3 log destination to your CloudFront distribution(s), with the destination configured to:
<bucket-name>.s3.amazonaws.com
(Reminder: this guide was tested with what the AWS Console now calls the "Amazon S3 (legacy)" destination. Using the "Amazon S3" non-legacy destination might also work.)
At this point, access logs from your CloudFront distribution should be sent to the S3 bucket in the target account.