Using Traefik and Docker for easy web service hosting
I have been using Traefik for reverse-proxying various services running in Docker for multiple years now, and have come to appreciate the ease of use and flexibility it provides me. The fewer steps it takes me and the faster it is to test a new service, the more time I can spend on actually using the service.
This article shows how I use Traefik and Docker to achieve the following points when hosting a new service:
- No DNS reconfiguration.
- No additional port forwarding.
- No additional firewall rules.
- HTTPS/TLS by default.
- Single point of configuration.
- No "dependency hell" on the host.
High-level outline
- Use a wildcard DNS entry to point to the Docker host.
- Run Traefik in Docker, with automatic discovery of other services running on the same Docker host.
- Set up wildcard TLS certificates using Let's Encrypt.
- Run a new service in Docker, demonstrating the label-driven auto-configuration for Traefik.
Assumptions
-
You have an internet-facing Linux-based1 server with Docker and Docker Compose installed.
If you don't have Docker installed yet, you can find details in the official docs.2
-
You own a domain and can configure DNS records for it.
This article is going to use
example.comfor demonstration purposes throughout. -
The DNS zone for your domain is hosted at a DNS provider that Traefik can automatically interact with to prove domain ownership unless you don't want to use wildcard certificates. See the Traefik documentation for a list of supported providers along with setup documentation.
The use of a wildcard certificate (i.e.
*.example.com) has the main advantage that a new service is going to be immediately available with a valid HTTPS certificate without having to wait for a new certificate for a specific subdomain (e.g.my-service.example.com) to be issued.This article is going to demonstrate the use of Google Cloud DNS, although it will not describe setting up the credentials.
If your DNS provider is not supported by Traefik, you can either not use wildcard certificates, or you can look into migrating your DNS zone to a supported provider.
Set up Traefik
Traefik is going to run in Docker and will be configured using Docker Compose with a docker-compose.yaml file.
The final project structure described in this article will look like this:
docker-configs/
├─ traefik/
│  ├─ docker-compose.yaml
│  ├─ traefik.yaml
│  ├─ configs/
│  │  ├─ tls.yaml
│  │  ├─ traefik-dashboard.yaml
├─ whoami/
│  ├─ docker-compose.yaml
Feel free to deviate from this structure as you see fit.
Create wildcard DNS record
Creating the DNS record you are going to use sooner rather than later is preferable, that way it has the highest chance of being available by the time you want to interact with it.
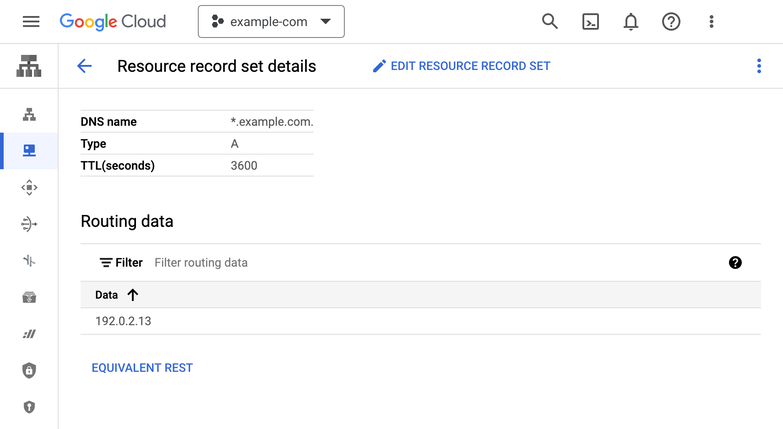
Make sure that you create the following records for your domain, that point to your server.
Only add the AAAA IPv6 records if you have an IPv6 address for your server.
| Type | Name | Value |
|---|---|---|
A | example.com | The public IPv4 of your server. |
A | *.example.com | The public IPv4 of your server. |
AAAA | example.com | The public IPv6 of your server, if you have one. |
AAAA | *.example.com | The public IPv6 of your server, if you have one. |
Select a sensible TTL, everything from 5 minutes to one hour is likely a good choice. Do note that if you set the TTL very high, it will take longer for the DNS record to be updated if you ever need to change the IP address of your server.
This is what this looks like in Google Cloud DNS, for example:
Create the project structure
Go into a directory in which you want to store the configuration files for Traefik and other services, here called docker-configs, and create the following directories:
docker-configs/$ mkdir -p traefik/acme/
docker-configs/$ mkdir -p traefik/configs/
docker-configs/$ mkdir -p whoami/
Create an explicit reverseproxy Docker network
To achieve some separation of concerns in regard to Docker network traffic, I suggest creating an explicit network that will be used between Traefik and the containers that provide web services. Databases and other services that should never be exposed to the internet will not be part of the network, but rather of a per-service network.
Use the following command to create the explicit reverseproxy network:
$ sudo docker network create reverseproxy
Create docker-compose.yaml for Traefik
Create docker-configs/traefik/docker-compose.yaml with the following suggested content:
version: '3'

services:
  traefik:
    image: traefik:2.10                            # 1
    restart: unless-stopped                        # 2
    ports:                                         # 3
    - "80:80"
    - "443:443"
    networks:
    - reverseproxy                                 # 4
    volumes:
    - /var/run/docker.sock:/var/run/docker.sock:ro # 5
    - ./traefik.yaml:/traefik.yaml:ro              # 6
    - ./configs:/configs:ro                        # 6
    - ./acme:/acme                                 # 7

networks:
  reverseproxy:                                    # 8
    external: true
I have added numbered comments above to explain what the impact of the lines is. You can switch to the "Without markers" tab to get the same content without the markers.
-
Traefik version 2 was the latest version during the writing of this article.
Upgrading within the 2.x branch should be possible without requiring any configuration changes – I never had issues on any hop from 2.0 up to 2.10. Do note though that Traefik 3 was in beta at the time of writing, so it might be the latest version by the time you are reading it. Upgrading from Traefik 2 to Traefik 3 might require configuration changes from what is displayed in this article.
-
restart: unless-stoppedensures that Traefik is automatically restarted if it crashes or the host-server is rebooted.I vastly prefer
unless-stoppedoveralwaysbecause it allows me to explicitly stop a container usingdocker-compose stopwithout it automatically restarting on me, while still ensuring that an abnormal exit is covered. -
The
portssection exposes ports 80 and 443 to the host, which is required for Traefik to be able to serve HTTP and HTTPS traffic.You might have to configure your host firewall to allow incoming traffic on these ports. (Plug: my tool DFW can help you with that.)
-
The
networkssection connects the container to the previously createdreverseproxynetwork. -
Mounting
/var/run/docker.sockinto the container allows Traefik to automatically discover other containers running on the same host. -
traefik.yamland theconfigs/directory will contain the configuration for Traefik. -
Traefik will automatically request certificates from Let's Encrypt later. To ensure they are persisted across restarts of Traefik, we mount the
acmedirectory into the container, which is where we'll tell Traefik to store the certificates. -
The
networkssection defines thereverseproxynetwork as external, which means that it is not created by Docker Compose, but rather that it is expected to already exist.This is the network that we created in the previous step.
Create traefik.yaml
To achieve the goal I initially described, we'll have to configure Traefik to auto-discover Docker services and to handle certificate creation. We'll also configure Traefik to automatically redirect from HTTP to HTTPS, to be secure by default.
Create docker-configs/traefik/traefik.yaml with the following suggested content:
global:
checkNewVersion: true
sendAnonymousUsage: true # 1
log:
level: "INFO"
entryPoints:
web:
address: ":80"
http:
redirections: # 2
entryPoint:
to: "websecure"
scheme: "https"
websecure:
address: ":443"
http:
tls: # 3
api:
dashboard: true # 4
providers:
providersThrottleDuration: "2s"
docker: # 5
network: reverseproxy
exposedByDefault: false
watch: true
endpoint: "unix:///var/run/docker.sock"
file: # 6
watch: true
directory: "/configs"
certificatesResolvers: # 7
default:
acme:
email:
storage: "/acme/storage.json"
dnsChallenge:
provider: "gcloud"
delayBeforeCheck: "0s"
As before, the numbered comments are just there to explain what the impact of the lines is:
-
Sending anonymous usage information of Traefik is optional, and feel free to disable it by setting
sendAnonymousUsage: false, but I'm personally happy to share some anonymous data with Traefik. -
The
redirectionssection configures Traefik to redirect all HTTP traffic to HTTPS.It works by configuring the
webentrypoint to redirect all requests to thewebsecureendpoint, applying thehttpsscheme. -
The existence of the
http.tlsentry configures thewebsecureendpoint to require inbound traffic to be encrypted, which is what makes this endpoint an HTTPS-endpoint. -
Traefik has a built-in dashboard that is extremely helpful in identifying what routers and services exist, and what additional middleware might be configured.
It is disabled by default, but can be enabled by setting
dashboard: true.Traefik will expose the dashboard on the Traefik container on port 8080. Do note that we have not referenced this port at all. What we'll do instead is teach Traefik to proxy dashboard traffic to itself on port 8080, but with a layer of authentication.
-
The
dockerprovider is responsible for auto-discovering other containers running on the same host.network: reverseproxytells Traefik to route traffic to containers via thereverseproxynetwork, which we created earlier.We set
exposedByDefault: falseto ensure that containers are not automatically exposed to the internet, but rather that we have to explicitly configure them to be exposed. We also setwatch: trueto ensure that Traefik automatically detects new containers and updates its configuration accordingly.The
endpointentry tells Traefik where to find the Docker daemon socket, which we have mounted to/var/run/docker.sockin thevolumessection of thedocker-compose.yaml. -
The
fileprovider is responsible for loading additional configuration files from the/configsdirectory (which is the path within the container that we have mounted the host path to).Again, we set
watch: trueto ensure that Traefik automatically detects changes to the configuration files without requiring a restart. -
The
certificatesResolverssection configures Traefik to request certificates using ACME, by default from Let's Encrypt.3The
emailentry is the email address that Let's Encrypt will use to contact you in case your certificate is expiring, indicating failure in auto-renewal. You can also remove this field, in which case you will not be informed.What you'll most likely have to modify is the
dnsChallengesection, which as shown here configures Traefik to use thegcloudprovider to prove domain ownership. If you are using a different DNS provider, you will have to look up the name of the provider in the Traefik documentation and modify theproviderentry accordingly.If you don't want to use wildcard certificates, you can remove the
dnsChallengesection entirely.
Preconfigure wildcard TLS certificate to request
If you don't want to use wildcard certificates, you can skip this section.
Create docker-configs/traefik/configs/tls.yaml with the following suggested content:
tls:
  stores:
    default:
      defaultGeneratedCert:   # 1
        resolver: default     # 2
        domain:               # 3
          main: "example.com"
          sans:
          - "*.example.com"
-
defaultGeneratedCertinstructs Traefik that, by default, it should generate the certificate shown here. -
The
resolverentry tells Traefik to use thedefaultresolver, which we previously configured intraefik.yaml. -
The
domainsection configures Traefik to request a wildcard certificate forexample.comand*.example.com.The
mainentry is the main domain for which the certificate is requested, and thesansentry is a list of additional domains for which the certificate is requested.
Prepare secure exposure of Traefik dashboard
While (at least currently) the Traefik API and dashboard are read-only interfaces, they still return data you likely don't want to expose to the public. Still, it should be relatively easy for you to access the dashboard, so that it actually brings you value.
The middle-ground I landed on is to configure HTTP basic authentication for the dashboard (which is secure when using HTTPS, which we will enforce in the configuration). Traefik suggests this approach, too.
Create docker-configs/traefik/configs/traefik-dashboard.yaml with the following suggested content:
http:
routers:
traefik-dashboard:
rule: "Host(`traefik.example.com`)" # 1
entrypoints:
- websecure # 2
service: "api@internal" # 3
middlewares:
- "traefik-dashboard-auth" # 4
tls:
middlewares:
traefik-dashboard-auth:
basicAuth:
users:
- # 5
# Example for user `username` with password `password`:
# "username:$2y$12$1A0feBVUe9zlgmtR9wxWLe2ccLAAybI/aymKB9pi.FB86KXtBdDDC"
-
The
ruleentry tells Traefik which incoming requests to route to the dashboard. Here, traffic totraefik.example.comwill be routed to the dashboard.You will have to replace
example.comwith your own domain. -
The
entrypointsentry tells Traefik to only expose the dashboard on thewebsecureentrypoint, which is the HTTPS endpoint we configured earlier.This ensures that plain-text HTTP access to the dashboard is not possible.
-
The
serviceentry tells Traefik where to find the dashboard. Traefik, when configured withapi.dashboard: true, as we have done, will expose the dashboard on theapi@internalservice. -
The
middlewaresentry tells Traefik to apply thetraefik-dashboard-authmiddleware to the dashboard, which is what enables the authentication layer.If this line isn't present, the dashboard will be exposed without authentication, so make sure to not accidentally remove it.
-
The
usersentry contains the username and password for the HTTP basic authentication. The value has to behtpasswdcompatible, and bcrypt is the suggested algorithm.You can generate a valid htpasswd value locally, using
htpasswd:$ htpasswd -n -B -C 12 usernameIf you don't have the
htpasswdbinary available, you can use the official Apache httpd Docker image to runhtpasswd:$ sudo docker container run --rm -it httpd:latest htpasswd -n -B -C 12 usernameMake sure you add the value in quotes to the YAML file, otherwise YAML might misinterpret either the
$sequences or the:. The result in the YAML should look like this:users: - "username:$2y$12$1A0feBVUe9zlgmtR9wxWLe2ccLAAybI/aymKB9pi.FB86KXtBdDDC"
Integrate your DNS provider
Now is the point where you'll integrate your DNS provider with Traefik if you intend to use wildcard certificates. Otherwise, you can skip this section.
As mentioned, this article will describe Google Cloud DNS integration, although not how to generate credentials. The exact steps you have to fulfill will vary if you use a different DNS provider, but the general idea will be the same. You can find the list of supported DNS providers in the Traefik documentation.
Assuming you have Google Cloud credentials in a JSON file available, store them in docker-configs/traefik/gcloud-auth.json.
The file should look similar to this:
Consider securing access to the file by making it readable only for your current user, as it could otherwise be abused by other users on the same system, allowing them to modify your DNS zone (or more, depending on how you have set up the credentials):
docker-configs/traefik/$ chmod 600 gcloud-auth.json
You have to make the credential file and GCE project ID available to Traefik by mounting the credentials file into the container and configuring two environment variables.
For this, you'll modify docker-configs/traefik/docker-compose.yaml:
- ./traefik.yaml:/traefik.yaml:ro
- ./configs:/configs:ro
- ./acme:/acme
+ - ./gcloud-auth.json:/gcloud-auth.json:ro
+ environment:
+ - GCE_PROJECT=example-com
+ - GCE_SERVICE_ACCOUNT_FILE=/gcloud-auth.json
networks:
reverseproxy:
version: '3'

services:
  traefik:
    image: traefik:2.10
    restart: unless-stopped
    ports:
    - "80:80"
    - "443:443"
    networks:
    - reverseproxy
    volumes:
    - /var/run/docker.sock:/var/run/docker.sock:ro
    - ./traefik.yaml:/traefik.yaml:ro
    - ./configs:/configs:ro
    - ./acme:/acme
    - ./gcloud-auth.json:/gcloud-auth.json:ro
    environment:
    - GCE_PROJECT="example-com"
    - GCE_SERVICE_ACCOUNT_FILE=/gcloud-auth.json

networks:
  reverseproxy:
    external: true
Start Traefik
Finally, you can start Traefik:
docker-configs/traefik/$ sudo docker-compose up -d
You can now check the logs for Traefik's startup, and they should look similar to this:
docker-configs/traefik/$ sudo docker-compose logs -f
The Error while creating certificate store message is expected since the certificate is just being created.
Please note that, if everything goes well, the last line you will see about the certificate creation is Register....
Unfortunately, Traefik does not log when the certificate creation is done (at least not on INFO level, it will on DEBUG) unless it has failed.
The creation will take about 2-3 minutes.
You should now be able to reach the Traefik dashboard under the domain you have configured, in our example https://traefik.example.com.
You will be greeted by a basic-auth dialog.
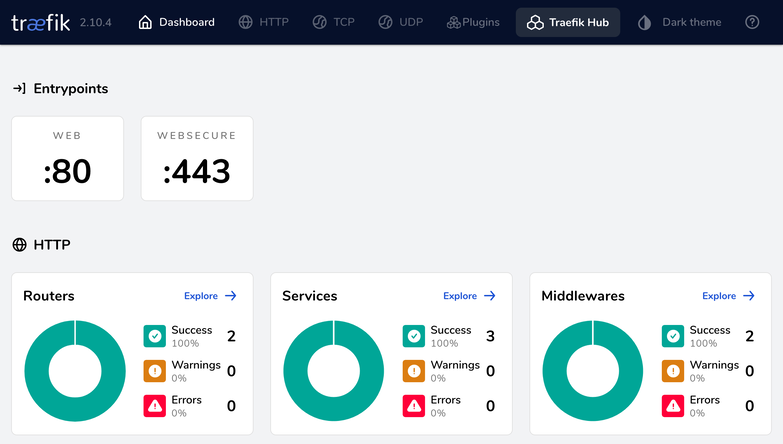
Upon entering the credentials you chose, you should see the Traefik Dashboard:
At this point, you have finished the hard part of the setup. The next section is going to show you through an example service how you can easily run new services and have them automatically reachable, with HTTPS, using the setup you just built.
Run an example service that is automatically proxied
Just like we are already proxying the Traefik dashboard with automatic HTTPS, in this section we'll run a simple service to be proxied.
We'll be using the traefik/whoami container image, which provides a tiny HTTP service that returns information about the request it received, which will give us insights into how the requests are routed.
Create docker-compose.yaml for whoami
Create docker-configs/whoami/docker-compose.yaml with the following suggested content:
version: '3'

services:
  whoami:                                                           # 1
    image: traefik/whoami:latest
    restart: unless-stopped
    networks:
    - reverseproxy                                                  # 2
    labels:                                                         # 3
    - 'traefik.enable=true'
    - 'traefik.http.routers.whoami.rule=Host(`whoami.example.com`)'

networks:
  reverseproxy:                                                     # 4
    external: true
-
Note that the
whoamiservice does not expose anyports.This is because Traefik will proxy traffic to the service, so the service does not have to expose any ports to the host.
-
The
networkssection connects the container to thereverseproxynetwork, which we created earlier.This way the Traefik container and the service container are part of the same network, ensuring traffic can flow.
-
The
labelssection contains the configuration for Traefik:-
The
traefik.enablelabel tells Traefik to enable the service, which is required for Traefik to proxy traffic to it. -
The
traefik.http.routers.whoami.rulelabel tells Traefik to create a router calledwhoamithat forwards traffic to the service if theHostheader matcheswhoami.example.com.
This point is where the core magic in using Traefik for proxying Docker services is: we can have the configuration for the service right next to the service itself, and Traefik will automatically pick it up and apply it.
-
-
The
networkssection defines that an already existingreverseproxynetwork exists, which is the network we created in a previous step.
Start whoami
The only thing left to do is to start the whoami service:
docker-configs/whoami/$ sudo docker-compose up -d
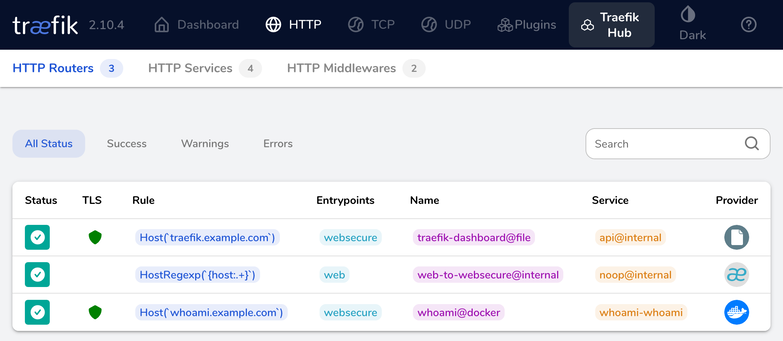
If you navigate in the Traefik dashboard to the "HTTP" tab, under "HTTP Routers" you should now see your new whoami service (next to the HTTP-to-HTTPS redirect and the Traefik dashboard itself):
You should also be able to reach the service under the domain you configured now, in our example https://whoami.example.com.
If you are not using wildcard certificates, you might get a certificate error if you open the page immediately, since the certificate is likely still being created. If you wait a few minutes, the certificate should be ready and you should be able to reach the service without any errors, too.
You should get output similar to this when you open the page:
Hostname: 49e45f022021
IP: 127.0.0.1
IP: 192.0.2.3
RemoteAddr: 192.0.2.3:58884
GET / HTTP/1.1
Host: whoami.example.com:443
User-Agent: Mozilla/5.0
Accept: text/html,...
Accept-Encoding: gzip, deflate, br
Accept-Language: en-US,en;q=0.5
Sec-Fetch-Dest: document
Sec-Fetch-Mode: navigate
Sec-Fetch-Site: cross-site
Te: trailers
Upgrade-Insecure-Requests: 1
X-Forwarded-For: 203.0.113.43
X-Forwarded-Host: whoami.example.com:443
X-Forwarded-Port: 443
X-Forwarded-Proto: https
X-Forwarded-Server: 5d56fdf0e461
X-Real-Ip: 203.0.113.43
If you study the output you'll notice a few interesting things, but the most relevant ones are probably the X-Forwarded-* headers that indicate that the proxying worked.
They are added by Traefik to inform the invoked service (whoami in this case) about the actual original request before it was forwarded by Traefik.
You should see your public IP in the X-Forwarded-For (and X-Real-Ip) header.
At this point you are done. 🎉 You now have a fully working Traefik setup that automatically proxies services you start, and automatically terminates HTTPS traffic.
Special case: Traefik is using the wrong port on the service, or can't find any port
There are some special cases where the single traefik.http.routers.<router-name>.rule label is not sufficient to configure the service.
Maybe you noticed in the whoami example that we did not tell Traefik on which port it could reach the whoami service.
This was not necessary because the traefik/whoami image marks only a single port as exposed, which is the one the service was running on, which is automatically identified by Traefik through the Docker provider.
Should you have a service that exposes no ports, or more than one, Traefik might either be unable to route traffic at all, or it might route it to the wrong port. In this case, you can add a label to explicitly tell Traefik which port the service is running on:
labels:
- # ...
- 'traefik.http.services.<service-name>.loadbalancer.server.port=<your-port>'
Replace <service-name> with a name of your choice, as long as it is unique across all services within Traefik.
(For the whoami container we could just use whoami.)
The Traefik container image referenced in this article does support Windows Server Core, which means you can likely apply what is shown in this article to Windows servers running the native Docker engine (not Docker for Desktop). Do note that I have not tested this.
Please note that "Docker Desktop" is not free for commercial use, but is likely not what you need anyway. For headless Linux servers, look into installing what is known as "Docker Engine" instead, which, as of the time of writing this article, has no restrictions in regards to commercial use, being licensed under the "Apache License 2.0".
ACME stands for "Automatic Certificate Management Environment", which is a protocol that Let's Encrypt established to allow for automated certificate issuance and renewal. Multiple certificate authorities (CA) can speak this protocol, not just Let's Encrypt. If you want to use a different CA, consult the Traefik documentation.